|
10.20 Contact Features
KB 2885, Release Note, Accounting Development, 7/24/2024
Version 10.20 and beyond introduces exciting enhancements to the Contact Module boosting accessibility and information visibility for improved decision-making!
Dealerships can ensure data consistency by utilizing the adaptable customization of Custom Fields. The functionality has been improved to offer Users a seamless experience when dealing with Contacts possessing multiple email addresses. Moreover, leverage enhanced visibility and sharing capabilities across Divisions to streamline Contact Management across various stores. Additionally, restricted Contacts are now denoted with an icon for concealed information and boast read-only name fields, safeguarding data integrity and deterring unauthorized alterations.
Read on to learn more about these features and more!
Manufacturer Loyalty Number
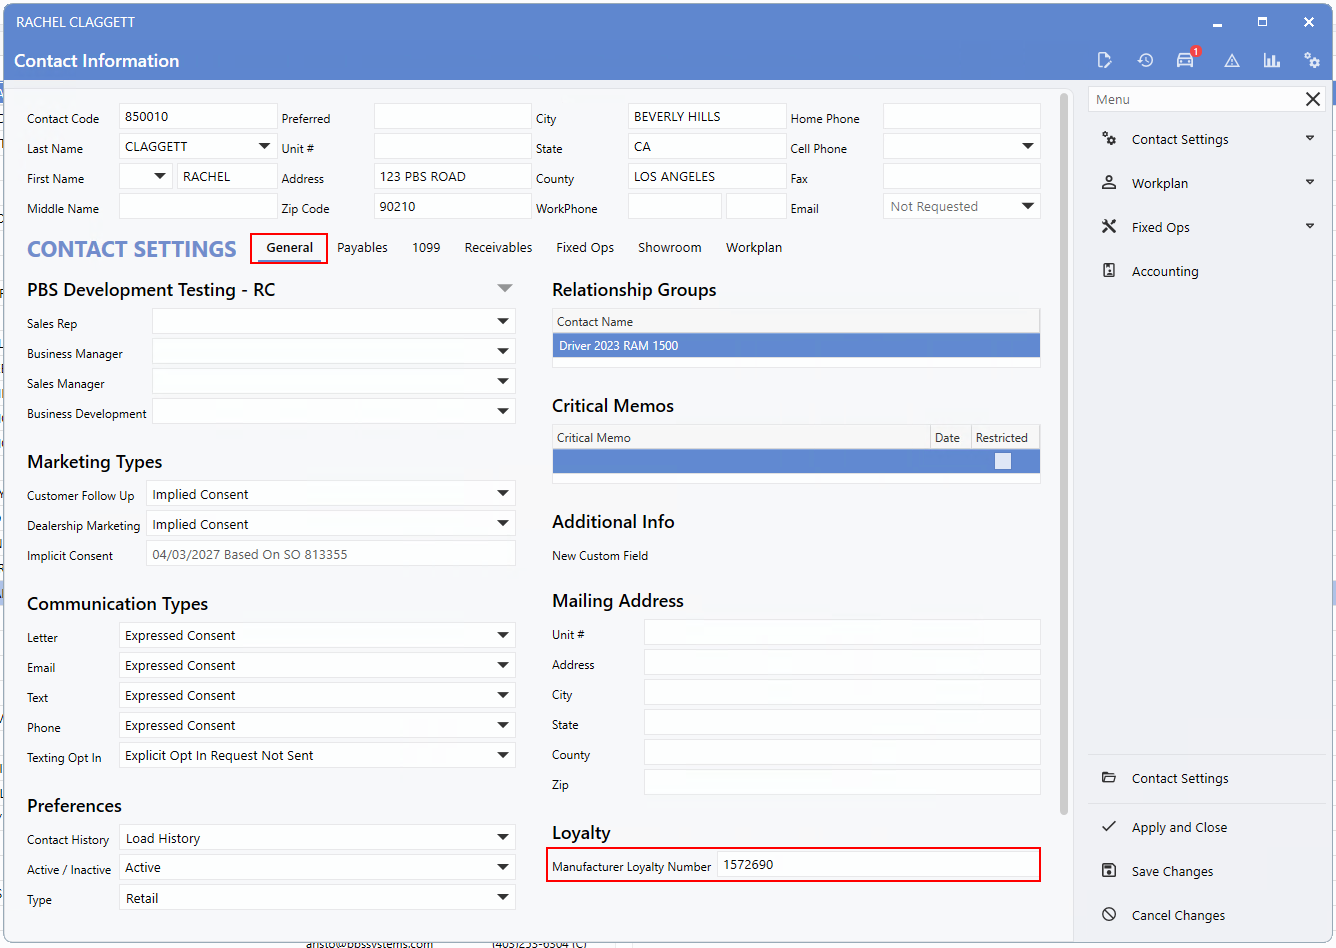
The
Manufacturer Loyalty Number
for a Customer is vital information required by multiple Departments. Due to the importance of this information it has been relocated from the Fixed Ops tab to the
General tab
within the
Contact
record. This adjustment enables Users with general access to view this information seamlessly, eliminating the necessity for a permission to access the Fixed Ops tab.
To access this feature, follow the path:
Contact record > General tab > Loyalty section > Manufacturer Loyalty Number
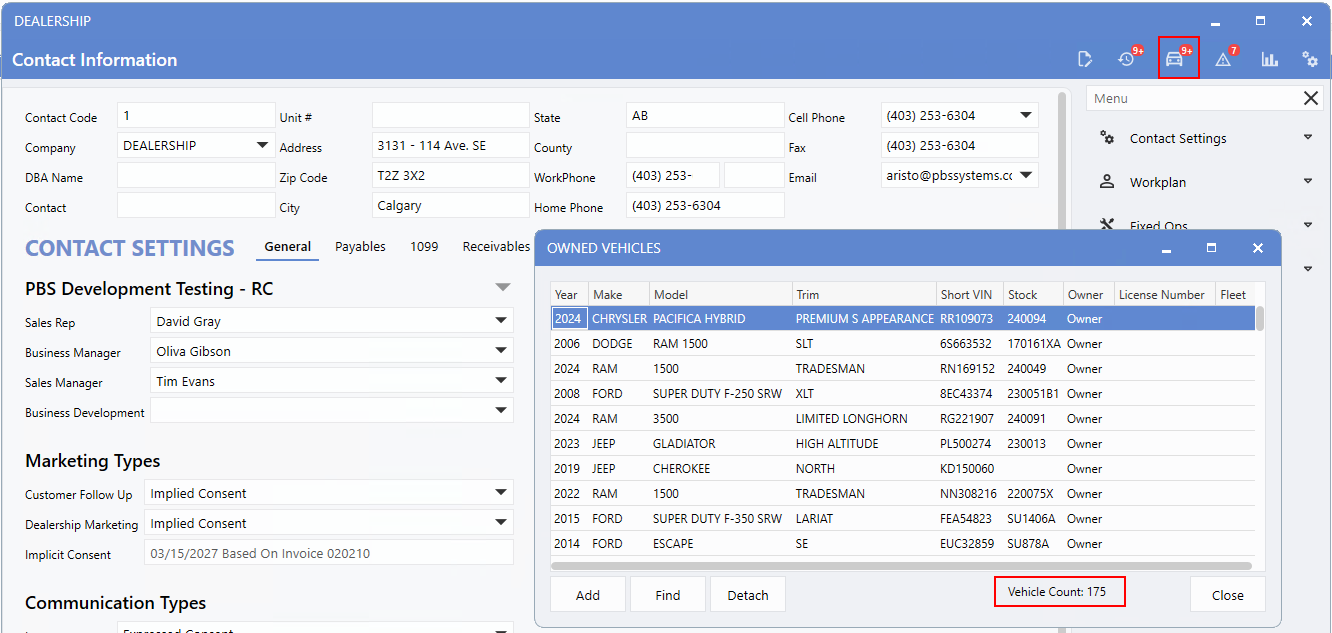
Owned Vehicles
The
Owned Vehicles
icon located at the top right of a Contact record can only display up to "9+" for the count. However, Users can now hover over the vehicle icon to reveal the precise count of Vehicles owned or driven by the Contact. Additionally, the hover tip continues to include the Hot Key (F8) for quick reference.
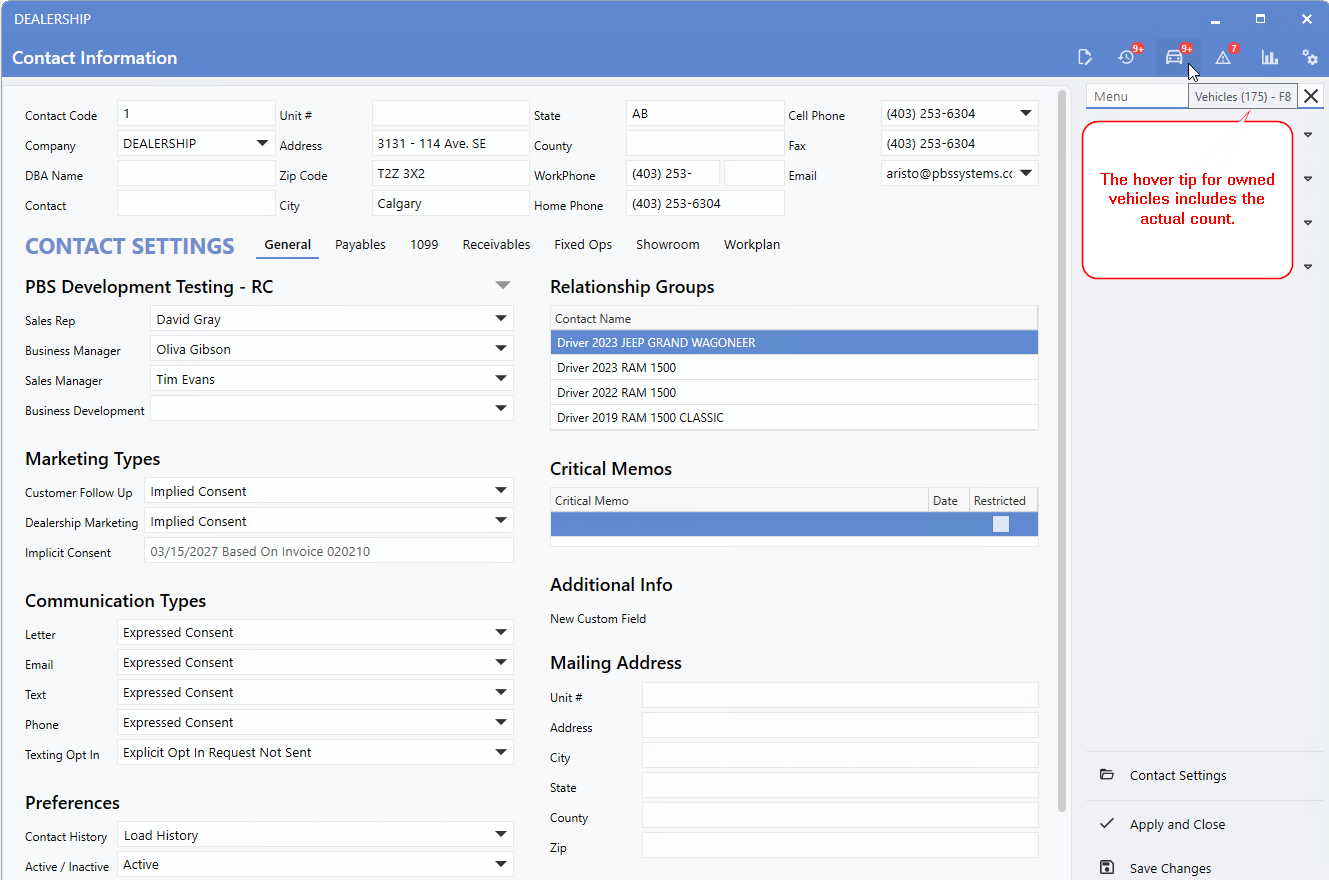
The
Owned Vehicles window
now includes the actual count at the bottom.
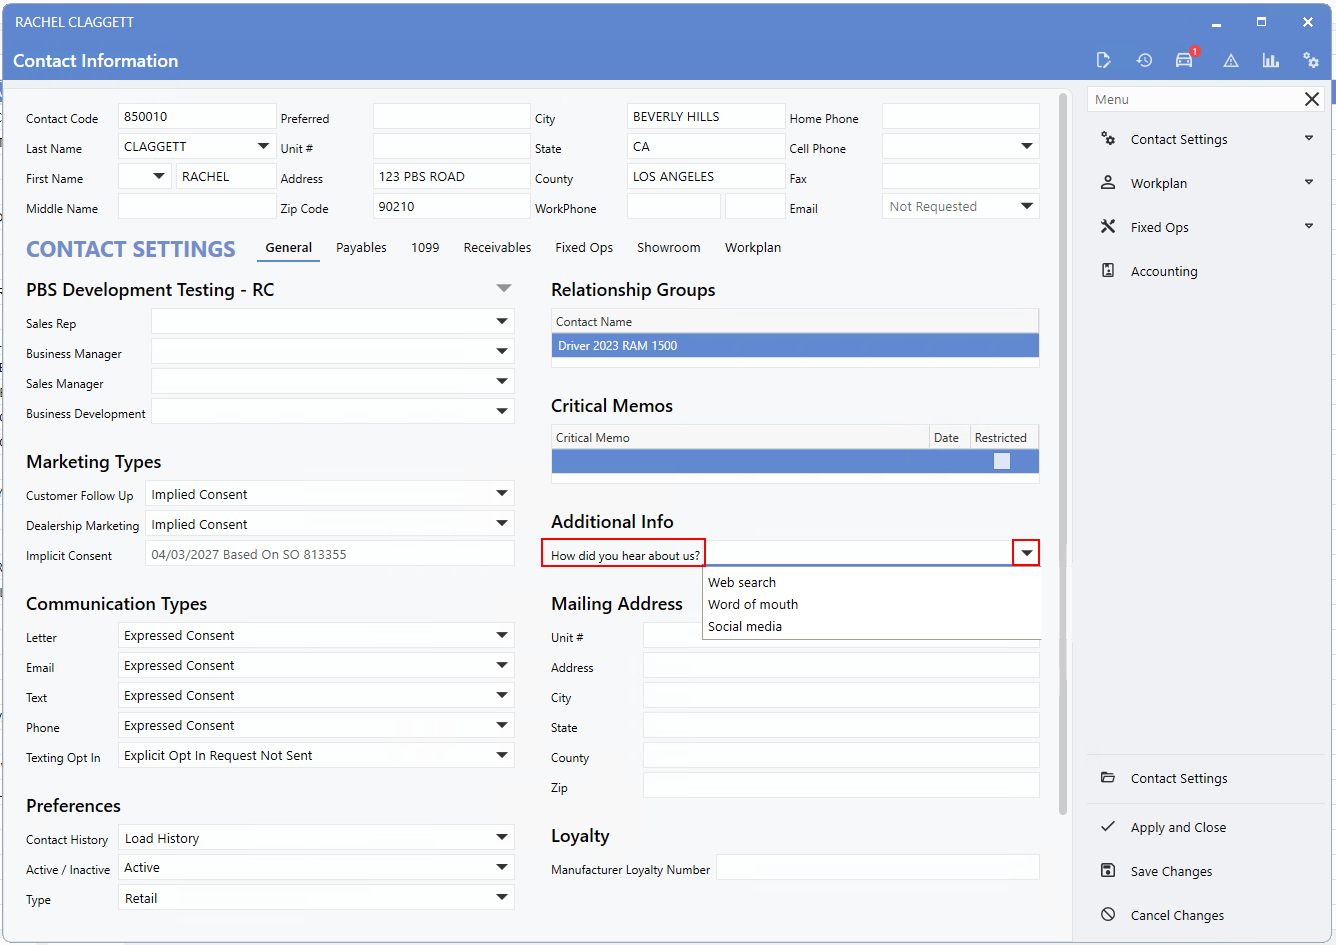
Custom Fields
Now, Custom Fields have the option to be configured as a Dropdown type. This grants the flexibility to tailor these fields more extensively while maintaining consistency throughout the Dealership by standardizing input information and its format.
When setting up a new Custom Field, select the
Dropdown
in the
Type
field. Click the *+* icon to include additional options. The
Option
fields are free type.
To access this feature, follow the path:
System > Contact > Maintenance > Custom Fields
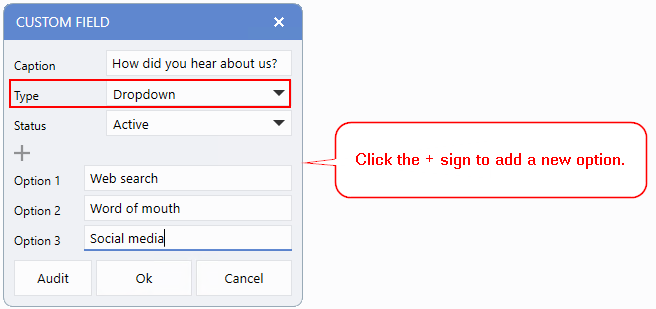
The Contact record will display these Custom Fields as a drop-down list.
Multiple Emails
We've made enhancements to Contacts with multiple email addresses to improve functionality and user experience.
When a Contact has an email, clicking the
action button
will directly open the
Email Addresses window,
eliminating the constant prompt to set the status to Not Requested or Denied. These options will only be displayed when no email is present.

The action button/icon within the
Email
field will change when a Contact has more than one email. This enhancement aims to improve User visibility, particularly when a Contact has multiple email addresses in the system.
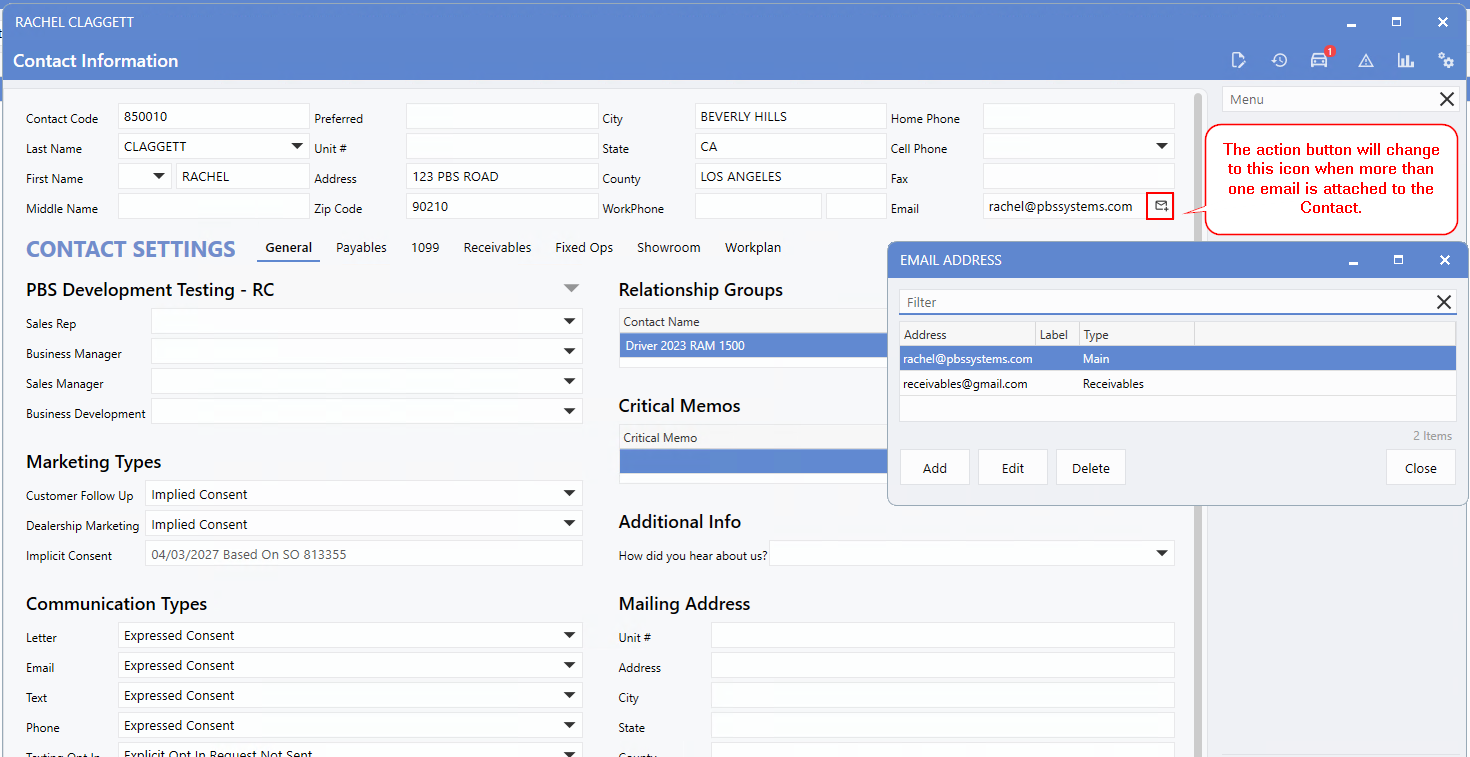
_Note: The icon will change the next time you open the Contact record after adding a second email. It will not update immediately upon adding the email.
Division Information
The upcoming changes will be advantageous for Dealerships operating multiple stores within the same database. We're introducing increased visibility and the ability to share setups across Divisions for Contacts, thus improving operational efficiency.
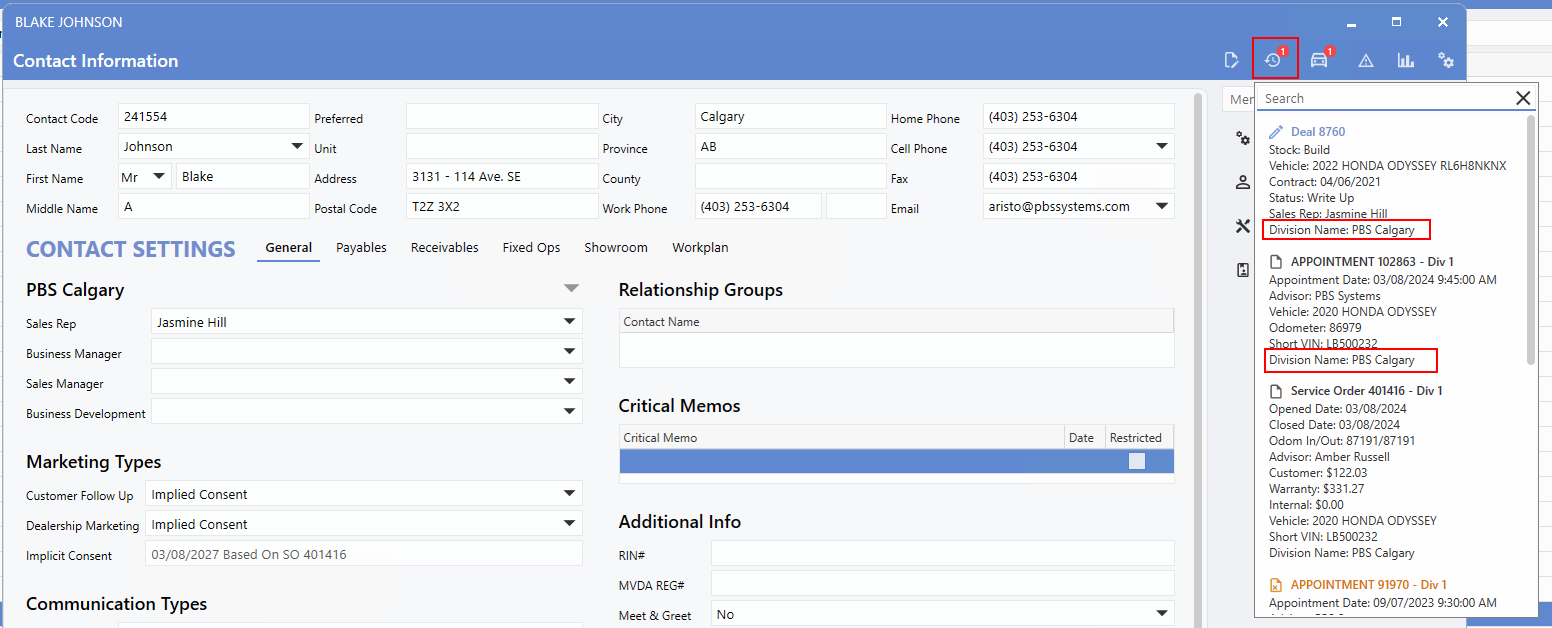
History Drop Down
The
History
dropdown list in the Contact record now includes the Division associated with each work item, similar to how it appears in Global Search. This feature simplifies tracking the origin of each item without the need to open them individually.
Broken Rules and Warnings
Now, Broken Rule and Warning prompts will specify the Division responsible for the issue and indicate the module from which the broken rule originates. This information will be shown when saving the Contact record and associated work items, eliminating the need for Users to search through multiple Divisions to identify the cause.

Payables and Receivables
The
Division selector
has been moved within the
Payables and Receivables tabs,
now positioned at the top and spanning the window's width. This adjustment aims to improve clarity concerning the chosen Division and underscores that all settings beneath the Division header are division-specific.

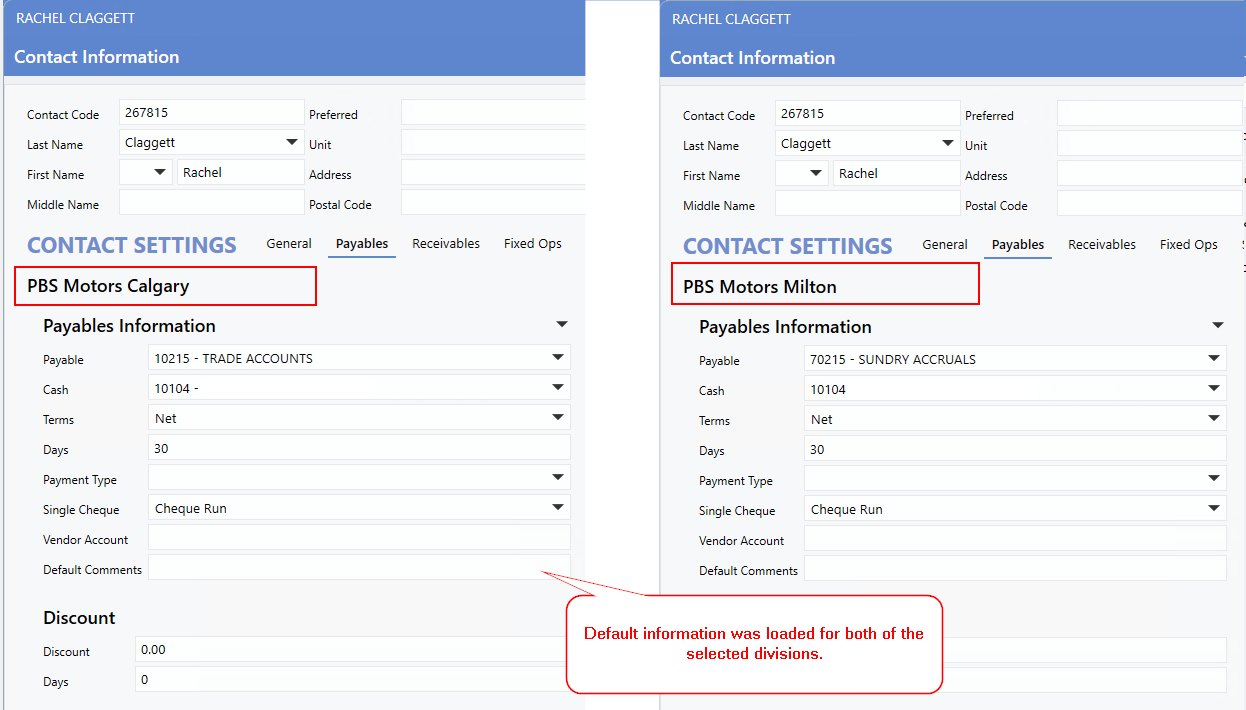
Users can now apply Customer and Vendor Defaults across multiple Divisions concurrently. Previously, the prompt would only appear once the Payable and/or Receivable account was added, and defaults would solely load for the current Division. This improvement allows Users to streamline the setup process for Customers and Vendors involved with multiple stores, thus saving time.
Simply click the
downward arrow
to the right of the
Payables Information
or
Receivables Information
headers and then select the Divisions you want to load defaults for.
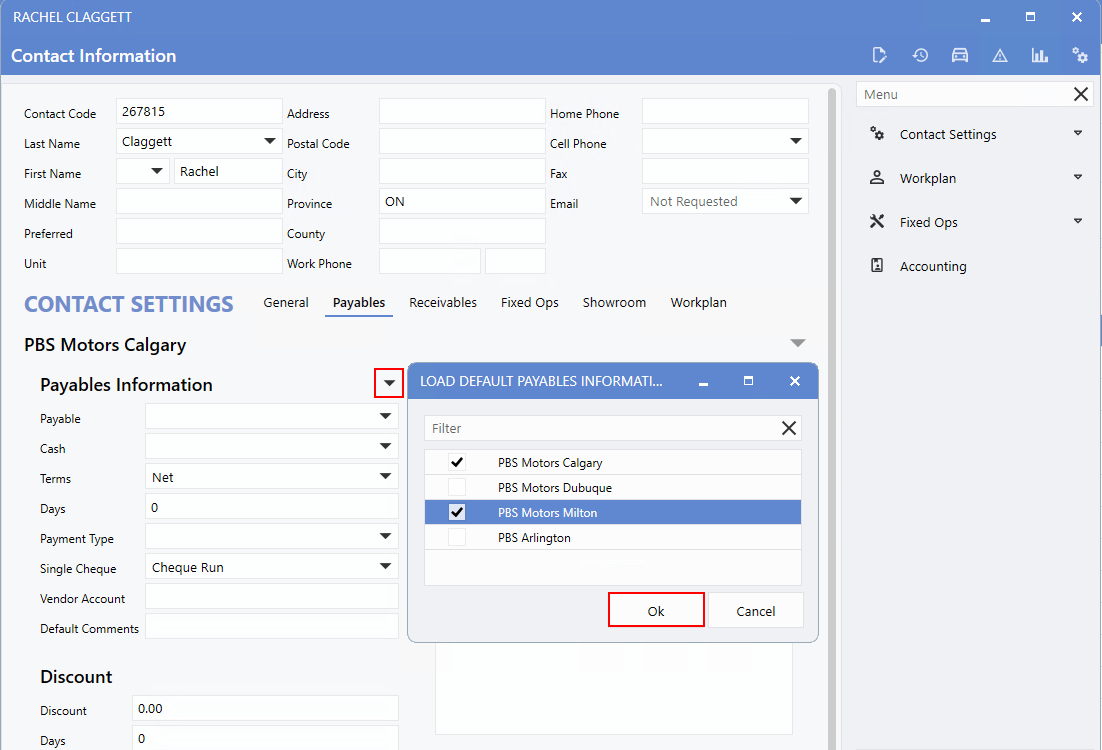
Defaults will load from the respective Divisions' Vendor and Customer Defaults.
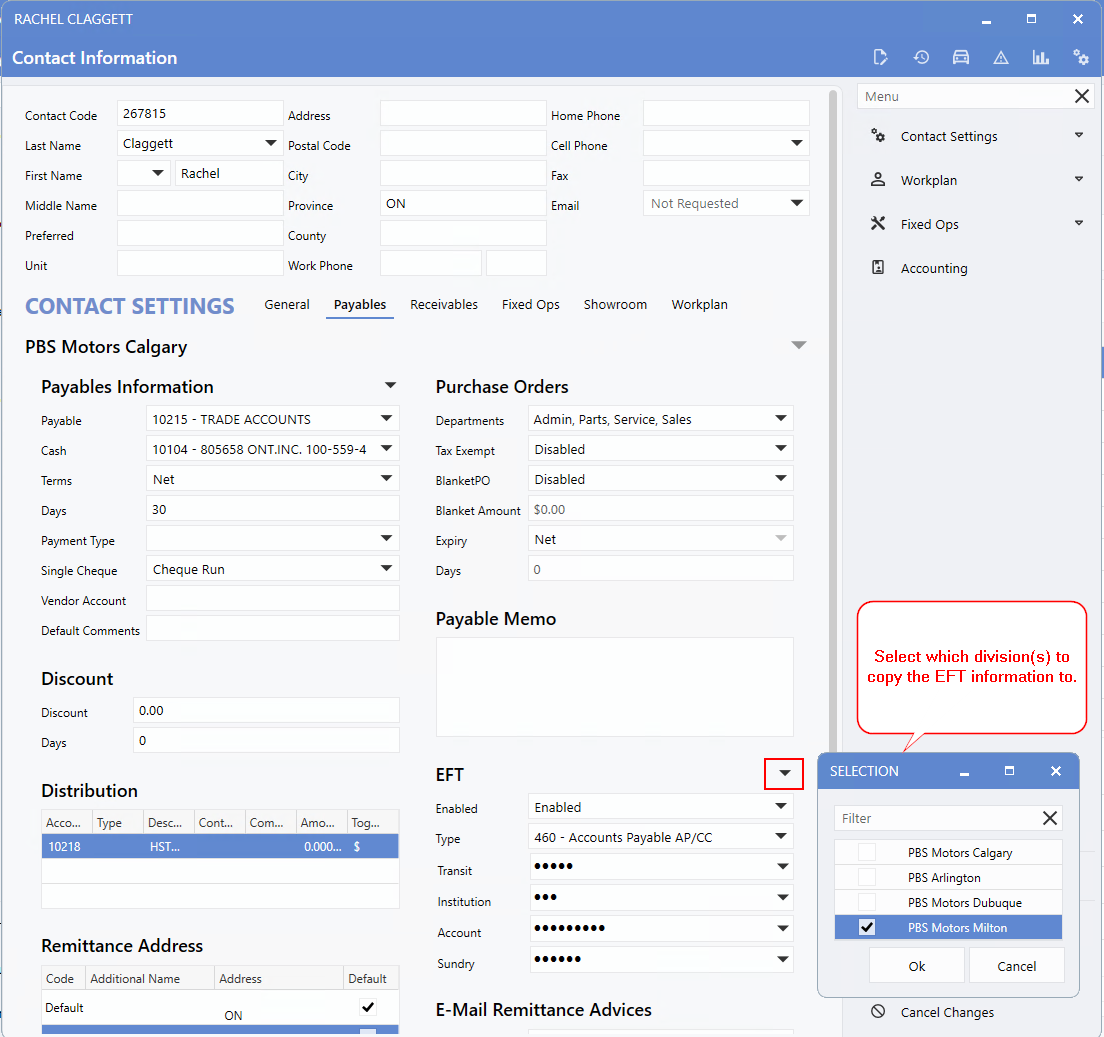
Furthermore, Users now have the capability to
copy EFT information across Divisions.
Given that most Vendors will possess identical banking information irrespective of the Dealership, Users can accelerate the data entry process by duplicating them from one Division to another.
Click the
downward arrow
to the right of the
EFT
header and then select the Division(s) you want to copy the information over to.
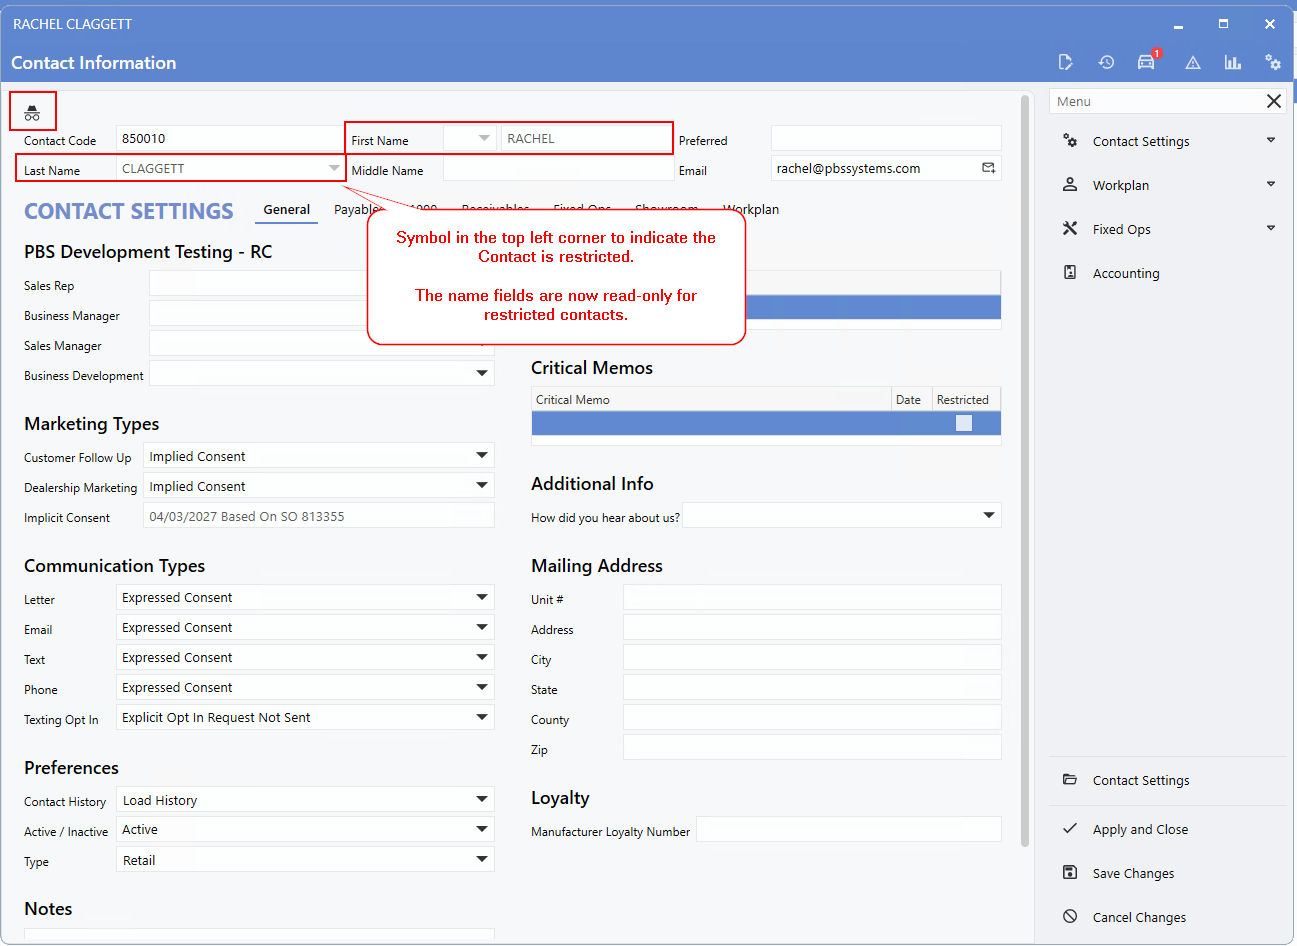
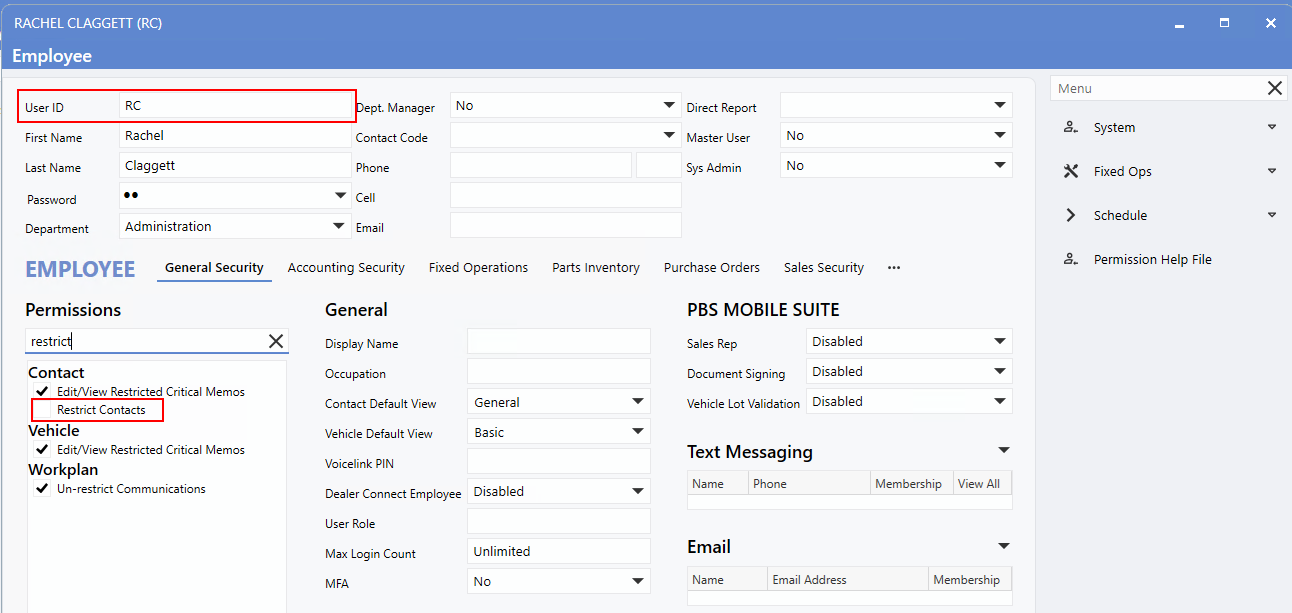
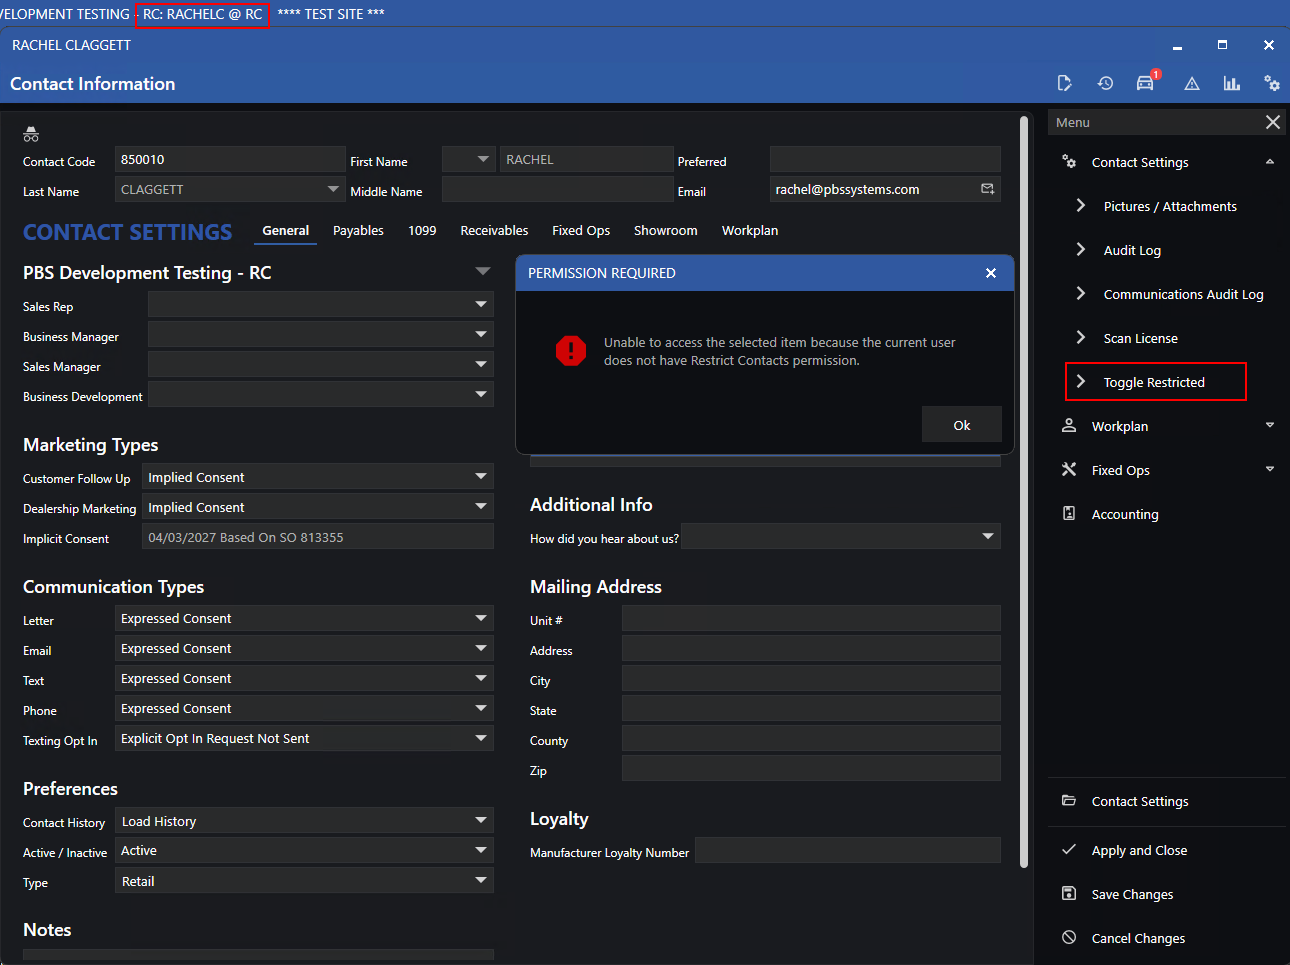
Restricted Contacts
Contacts flagged as
restricted
now display an icon in the top left of the Contact record providing an indication of hidden information. Furthermore, the
Name fields
are now read-only while a Contact is restricted, preventing unauthorized changes.
Revealing the information by
un-restricting
a Contact is still done by navigating to the
right menu
of the Contact record. However, instead of relying on a password within Contact Defaults, the software now references the permission
Restrict Contact
to determine whether the User has the authority to access this information.
For a User with
Restrict Contact
permission, clicking
Toggle Restricted
will reveal the hidden fields.
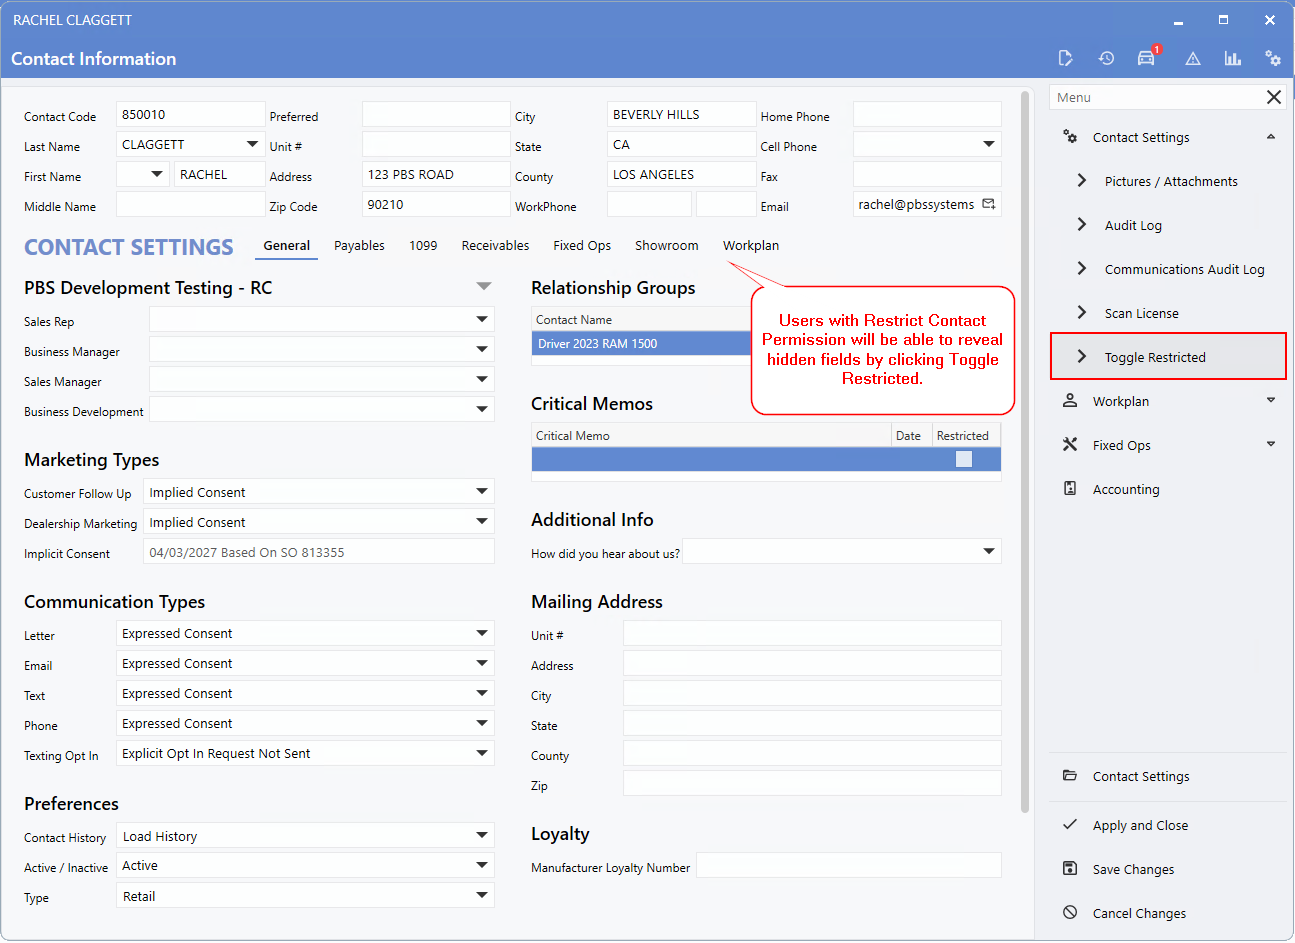
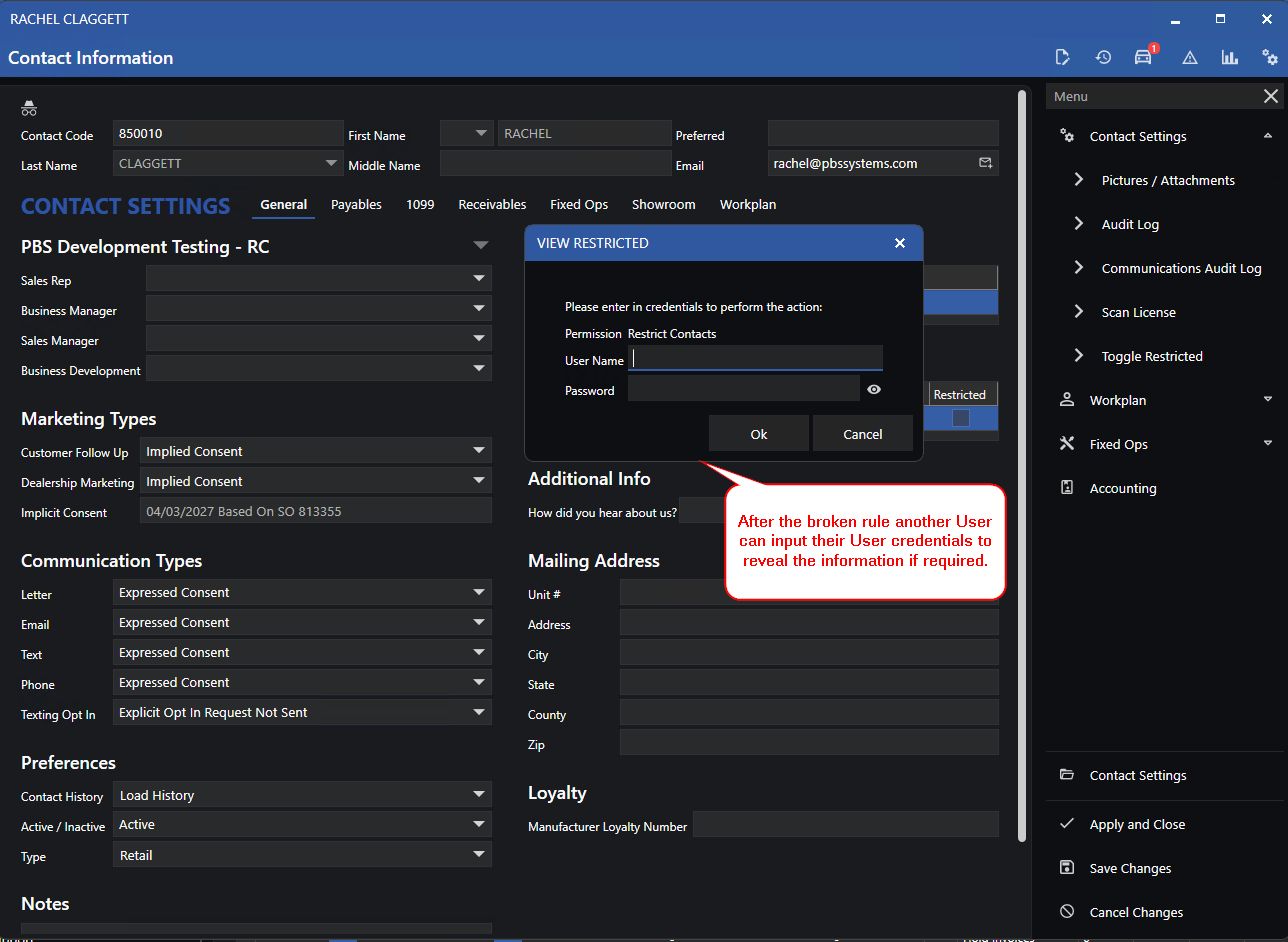
A User without the required permission will receive a broken rule.
Following the broken rule above, the software will trigger a prompt for a Username and Password. This enables another User to input their User Credentials to reveal the information if required.
Additional Contact Features:
-
Hot Key (ALT+T) has been added to view Contact settings from within a work item.
-
The Find Contact window now includes column options for AP Email and Alternate Email.
-
The Find Contact window* includes the option to add columns for Sales Rep,Sales Manager, Business Manager, and Business Development. Columns will include all assignees for each role in a multi-line list.
-
Find Contact Address field now includes unit number.
-
Users can now enable Invoice Hub through Update Contact in the right click of Find Contact and Customer Maintenance.
-
Users without permission to edit Contact names, AR or AP Headers will be able to copy the information in those fields.
-
Customer/Vehicle Find will now include a column for "Last Service Mileage".
-
State/Province abbreviations will be capitalized regardless of capitalization setups in Contact Defaults.
-
Customer Care Report item numbers are now hyperlinks that will take the User to the item in the Contact record.
|